Century-Line® Pipe Penetration Sleeves by Link-Seal®

- Preparing walls and floors for pipe, tube or conduit penetrations.
-
Description
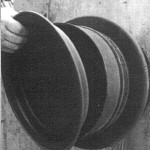
 Century-Line® Pipe Penetration Sleeves are used to create circular sleeved holes in concrete poured barriers including walls, floors, ceilings, structural supports and tank footings. Molded from non-conductive, high impact resistant HDPE, Century-Line® sleeves are lightweight and easily installed by one construction worker. They are available in 16 diameters ranging from 2" to 25" and shipped from stock in any desired length.
The System is the Solution. Century-Line® sleeves are engineered to mate with Link-Seal® modular mechanical seals for a lifetime of leak-proof performance.
PSI / Thunderline / Link-Seal® is your one-stop source for everything you need to effectively seal the annular space between pipes and concrete barriers through which they pass. See our charts for Century-Line® sleeve model numbers for standard size pipe along with corresponding Link-Seal modular seal model numbers.
-
Century-Line® Sleeve Features
- 16 sizes, 2" to 25" in diameter.
In the event of a field or engineering change, sleeves may be cut shorter at the job site using ordinary hand tools. Standard sleeves are 16" (40.6 mm) in length. Longer length models may also be quickly fabricated as a custom ordered item.
- 1/8 the weight of steel.
Century-Line® sleeves are light enough for one worker to install with-out a crane, hoist or helper which reduces installation time and costs. Century-Line® sleeves are easy to stock and store and far less expensive to ship, when compared to steel sleeves.
- Resists water migration.
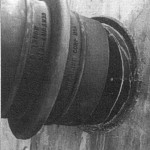
The 2" (50.8 mm) water stop collar not only anchors the sleeve in position, but creates a long tortuous path against the migration of water around the outside of the sleeve.
- Adjusts to wall thickness.
Century-Line® sleeves' unique hollow water stop collar acts like an expansion joint, adjusting (up to 1/2" - 12.7 mm) to the thickness of the wall. This compressive force reacts against the forms like a spring, creating a prevailing tension which maintains proper sleeve location within the form.
- Nailer end caps position sleeve precisely in form.
Specially designed end caps provide an ideal method for attaching Century-Line® sleeves to the concrete forms. The end caps assure that the sleeve holds its circular configuration during the pour. In addition to keeping out wet concrete, they also prevent dirt from entering the sleeve during backfill operations or the interim construction period.
- Tough, high-density polyethylene (HDPE) construction.
High impact-resistant HDPE also provides excellent resistance to acids, alkalis and other organic solvents. Ideal for cathodic protection systems, these non-conductive sleeves will neither rust, corrode or degrade. Low-temperature properties are such that they may be installed under any weather conditions suitable for pouring concrete. High-temperature application limit is 150°F (66° C). The sleeve is molded with a texture on the outside surface to assure a better bond, than most other plastics, to concrete interfaces.
- 16 sizes, 2" to 25" in diameter.
-
Installation - Century-Line® Sleeves
Century-Line® Sleeves are thermoplastic wall or floor pipe penetration sleeves. One person working alone can usually install a Century-Line® Sleeve regardless of the size.
Always wear safety equipment when installing or using Century-Line® Sleeves or Link-Seal Modular Seals.
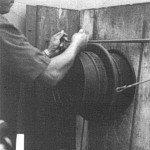
1. Measure the center line to position Century-Line® Sleeve end cap.
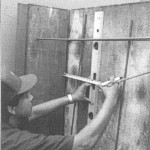
2. Nail one of the end caps at the marked center line.
3. Place the Century-Line® Sleeve on the end cap. The sleeve and end caps total length should be one-fourth longer than the width of the wall. Cut with a hand or power saw.
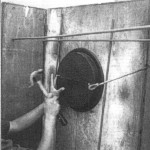
4. Place second end cap on sleeve. Check to determine that the cap is properly inserted.
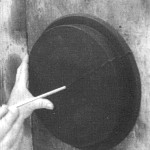
5. For additional stability, it's necessary to secure the sleeve with wire to the rebar. Inset the other end cap firmly and check that second end cap is positioned correctly and close the form.
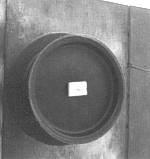
 6. After the concrete is poured and cured, remove end caps with screw driver or crow bar. End caps may be replaced to protect sleeve until pipe penetration is made.
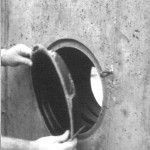
Alternative Technique Using Threaded Rod
After nailing end cap to form, drive threaded rod* through the end plate and form, and thread a nut* on other side. Remember to measure threaded rod to match length of sleeve.
Place sleeve over end cap nailed to the form.
* Items not provided by PSI or CCP.

Place second cap on the sleeve. Use a block of wood* and wing nut* to tighten unit in place. Make certain sleeve is plumb.
Centering Century-Line®
To insure minimum water migration, center the water stop in wall by cutting equal lengths from each end of the sleeve, except as noted below. 
Wall Thickness Cut from Left End Dimension A Cut from Right End Dimension B 16" 0.0" 7.125" 0.0" 7.125" 14" 1.875" 6.125" 1.875" 6.125" 12" 1.875" 5.125" 1.875" 5.125" 10" 2.375" 4.625 3.375" 3.625" 8" 2.375" 4.625 5.375" 1.625"
Installation Notes:- Example: To convert 16" to 12", cut 2" off each end.
- Endcaps leave 1/2" depression in face of concrete.
- On sleeves under 12" length, install Link-Seal modular seal on the "long side" of the waterstop.
(a) For Link-Seal modular seals models LS-200, LS-275, LS-300, LS-315, LS-340 and LS-360, install with pressure plates flush with outer edge of the sleeve.
(b) For Link-Seal modular seals models LS-325, LS-400, LS-410, LS-425 and LS-475, install with pressure plates partially inserted into the sleeve. When tightened, the pressure plates will "pull" into the sleeve.
(c) For Link-Seal modular seals models LS-500, LS-525, LS-575 and LS-600, the minimum sleeve length is 10". Follow the instructions in Step 3 above.


