Installation Instructions PSI Link-Seal Modular Seals
Engineered seals for sealing pipes through walls, floors & casings.
Also see PSI Link-Seal Installation Video.
 |
 |
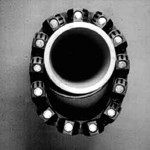 |
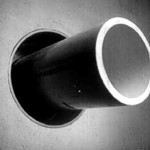
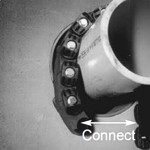
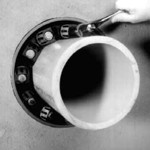
| 1. Center the pipe, cable or conduit in wall opening or casing. Make sure the pipe will be adequately supported on both ends. Link-Seal® modular seals are not intended to support the weight of the pipe. | 2. Loosen rear pressure plate with nut just enough so links move freely. Connect both ends of belt around the pipe. | 3. Check to be sure all bolt heads are facing the installer. Extra slack or sag is normal. Do not remove links if extra slack exists. Note: On smaller diameter pipe, links may need to be stretched. |
 |
 |
 |
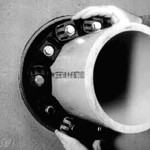
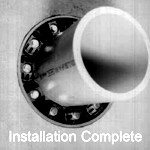
| 4. Slide belt assembly into annular space. For larger size belts, start inserting Link-Seal modular seal assembly at the 6 O'Clock position and work both sides up toward the 12 O'Clock position in the annular space. | 5. Using a hand socket or off-set wrench ONLY, start at 12 o'clock and tighten bolts until rubber begins to "bulge" Do not tighten any bolt more than 4 turns at a time. Continue in a clockwise manner until links have been uniformly compressed. (Approx. 2 or 3 rotations) | 6. Make 2 or 3 more passes at 4 turns per bolt max, tightening all bolts clockwise until all sealing elements bulge around all pressure plates. On type 316 stainless steel bolts, hand tighten ONLY without power tool. |
 |
Installation Notes: The Link-Seal® modular seal bolt heads are usually recessed below the wall opening or the edge of casing pipe; therefore a socket or offset wrench must be used. Hand Tools: Use 5/16" hex or #6 screwdriver for LS-200. 1/2" hex requires 3/8" drive socket wrench. 9/16" and 3/4" hex requires 1/2" drive socket wrench. Tools not provided. Always Wear Safety Equipment when Installing or Using Link-Seal® modular seals! |
|
| 7. If the seal doesn't appear to be correct using the instructions provided, call CCP at 310-532-9314 | ||
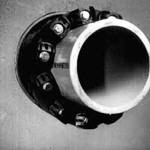 |
Link-Seal® Modular Seal - Do's
|
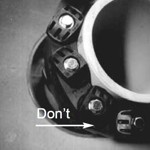 |
Link-Seal® Modular Seal - Don'ts
|